


不错呦!smile@林凯西,确保“准备文件”中的几个文件都有安装,S...您好,看了您这篇帖子觉得很有帮助。但是有个问题想请...我的修改过了怎么还被恶意注册呢 @jjjjiiii 用PJ快9年了,主要是A...PJ3啊,貌似很少有人用PJ了,现在不是WP就是z...@332347365,我当时接入时错误码没有-10...楼主,ChkValue值应为-103是什么意思呢?...大哥 你最近能看到我发的信息,请跟我联系,我有个制...
ASP.NET使用CKEditor+CKFinder示例
编辑:dnawo 日期:2012-04-23
CKEditor是一个文本编辑器,它的前身为FCKeditor。CKEditor不具备文件上传和管理功能,需要借助CKFinder来实现。
一、下载文件
CKEditor 3.6.3(ckeditor_3.6.3.zip):http://ckeditor.com/download
CKEditor.NET 3.6.2(ckeditor_aspnet_3.6.2.zip):http://ckeditor.com/download
CKFinder.NET 2.2.1(ckfinder_aspnet_2.2.1.zip):http://ckfinder.com/download
二、安装配置
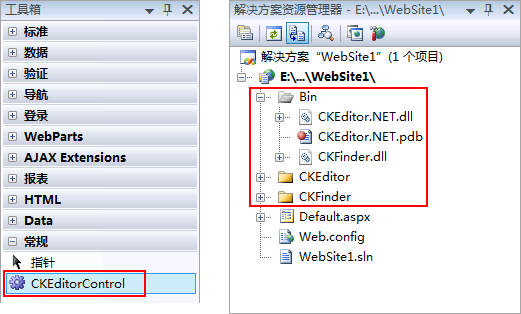
1.安装CKEditor
解压下载的zip文件到网站/CKEditor文件夹。
2.安装配置CKEditor.NET
·解压下载的zip文件到任意文件夹;
·在vs2008网站中引用bin/Release/CKEditor.NET.dll;
·在工具箱中添加选择项;
3.安装CKFinder.NET
·解压下载的zip文件到网站/CKFinder文件夹;
·在vs2008网站中引用bin/Release/CKFinder.dll;
·打开/CKFinder/config.ascx文件,修改CheckAuthentication方法根据用户权限返回true/false;
三、使用示例
从工具箱拖动CKEditor控件到ASP.NET页面上,在Page_Load函数增加如下代码为CKEditor增加文件上传功能:
Default.aspx:
四、常见问题
问:ASP.NET服务器端怎么读取CKEditor控件内容?
答:使用CKEditorControl1.Text。
问:ASP.NET怎么增加/删除CKEditor工具栏按钮?
答:以下为完整的CKEditor工具栏按钮,根据需要修改:
问:CKEditor控件有几种皮肤?怎么设置?
答:CKEditor控件自带三种皮肤:kama、office2003和v2,设置方法:
一、下载文件
CKEditor 3.6.3(ckeditor_3.6.3.zip):http://ckeditor.com/download
CKEditor.NET 3.6.2(ckeditor_aspnet_3.6.2.zip):http://ckeditor.com/download
CKFinder.NET 2.2.1(ckfinder_aspnet_2.2.1.zip):http://ckfinder.com/download
二、安装配置
1.安装CKEditor
解压下载的zip文件到网站/CKEditor文件夹。
2.安装配置CKEditor.NET
·解压下载的zip文件到任意文件夹;
·在vs2008网站中引用bin/Release/CKEditor.NET.dll;
·在工具箱中添加选择项;
3.安装CKFinder.NET
·解压下载的zip文件到网站/CKFinder文件夹;
·在vs2008网站中引用bin/Release/CKFinder.dll;
·打开/CKFinder/config.ascx文件,修改CheckAuthentication方法根据用户权限返回true/false;
三、使用示例
从工具箱拖动CKEditor控件到ASP.NET页面上,在Page_Load函数增加如下代码为CKEditor增加文件上传功能:
复制内容到剪贴板 程序代码
程序代码
程序代码CKFinder.FileBrowser _FileBrowser = new CKFinder.FileBrowser();
_FileBrowser.SetupCKEditor(CKEditor控件名称);
_FileBrowser.SetupCKEditor(CKEditor控件名称);
Default.aspx:
复制内容到剪贴板 程序代码
程序代码<%@ Page Language="C#" %>
<%@ Register assembly="CKEditor.NET" namespace="CKEditor.NET" tagprefix="CKEditor" %>
<!DOCTYPE html PUBLIC "-//W3C//DTD XHTML 1.0 Transitional//EN" "http://www.w3.org/TR/xhtml1/DTD/xhtml1-transitional.dtd">
<script runat="server">
protected void Page_Load(object sender, EventArgs e)
{
if (!Page.IsPostBack)
{
CKFinder.FileBrowser _FileBrowser = new CKFinder.FileBrowser();
_FileBrowser.SetupCKEditor(CKEditorControl1);
}
}
protected void Button1_Click(object sender, EventArgs e)
{
Label1.Text = CKEditorControl1.Text;
}
</script>
<html xmlns="http://www.w3.org/1999/xhtml">
<head runat="server">
<title>ASP.NET使用CKEditor+CKFinder示例-Mzwu.Com</title>
</head>
<body>
<form id="form1" runat="server">
<div>
<CKEditor:CKEditorControl ID="CKEditorControl1" runat="server">
</CKEditor:CKEditorControl>
</div>
<asp:Button ID="Button1" runat="server" onclick="Button1_Click" Text="Button" />
<br />
<asp:Label ID="Label1" runat="server" Text="Label"></asp:Label>
</form>
</body>
</html>
四、常见问题
问:ASP.NET服务器端怎么读取CKEditor控件内容?
答:使用CKEditorControl1.Text。
问:ASP.NET怎么增加/删除CKEditor工具栏按钮?
答:以下为完整的CKEditor工具栏按钮,根据需要修改:
复制内容到剪贴板 程序代码
程序代码CKEditorControl1.config.toolbar = new object[]
{
new object[] { "Source", "-", "Save", "NewPage", "Preview", "-", "Templates" },
new object[] { "Cut", "Copy", "Paste", "PasteText", "PasteFromWord", "-", "Print", "SpellChecker", "Scayt" },
new object[] { "Undo", "Redo", "-", "Find", "Replace", "-", "SelectAll", "RemoveFormat" },
new object[] { "Form", "Checkbox", "Radio", "TextField", "Textarea", "Select", "Button", "ImageButton", "HiddenField" },
"/",
new object[] { "Bold", "Italic", "Underline", "Strike", "-", "Subscript", "Superscript" },
new object[] { "NumberedList", "BulletedList", "-", "Outdent", "Indent", "Blockquote", "CreateDiv" },
new object[] { "JustifyLeft", "JustifyCenter", "JustifyRight", "JustifyBlock" },
new object[] { "BidiLtr", "BidiRtl" },
new object[] { "Link", "Unlink", "Anchor" },
new object[] { "Image", "Flash", "Table", "HorizontalRule", "Smiley", "SpecialChar", "PageBreak", "Iframe" },
"/",
new object[] { "Styles", "Format", "Font", "FontSize" },
new object[] { "TextColor", "BGColor" },
new object[] { "Maximize", "ShowBlocks", "-", "About" }
};
问:CKEditor控件有几种皮肤?怎么设置?
答:CKEditor控件自带三种皮肤:kama、office2003和v2,设置方法:
复制内容到剪贴板 程序代码
程序代码CKEditorControl1.config.skin = "v2";
 上一篇: VS2008网站添加新项编码为UTF-8改成GB2312的方法
 下一篇: 浅析Sql Server参数化查询
 文章来自: 本站原创
 Tags:
Tags:  最新日志:
最新日志:
评论: 0 | 引用: 0 | 查看次数: 7549
发表评论
请登录后再发表评论!

